
Faqs
Display Specification Table using Metafields 🔥
4 min read
_LicE2CdB.jpg)
- Product metafields as table rows: Best when products share a consistent set of fields (e.g., Brand, Year, Weight).
- Page metafield: Ideal for products that require unique or flexible tables with varying structures.
💡 Tip: Hyper theme already includes the table-striped style for tables. Simply add the
class="table-striped to your <table> tag if you want a similar design to our main preset. That's way simpler! Check out our help guide for it here: Product Information blocks
Method 1: Product Metafields as Table Rows
When to use this method
- You have many products with the same specification fields.
- You want structured data that’s easy to update in bulk.
- You don’t want to create a new Page for every product.
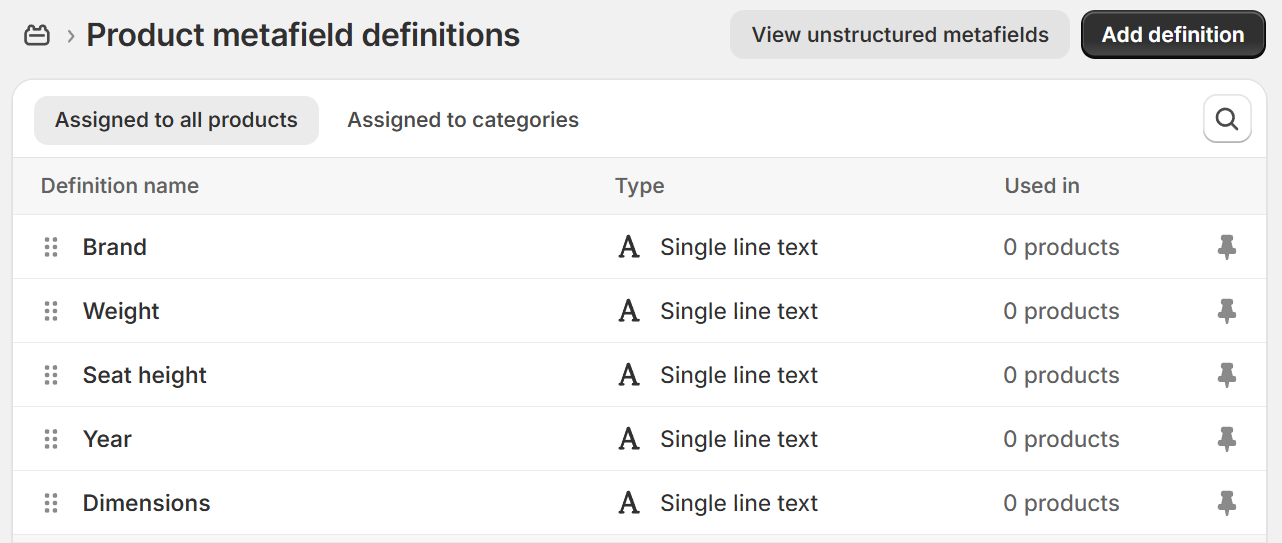
Step 1: Create Product Metafields
- In Shopify Admin, go to Settings > Custom Data > Products.
- Click Add definition.
- Create metafields for each type of information you want to show, for example:
- Brand (Single line text)
- Dimensions (Single line text)
- Year (Text or number)
- Seat height (Text or number)
- Weight (Text or number)
- Save your metafield definitions.
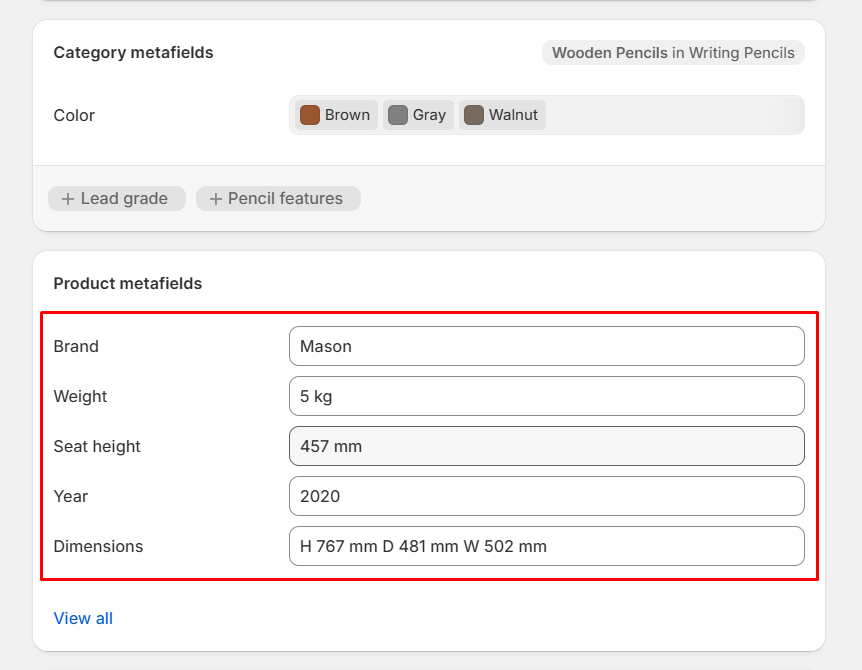
Step 2: Fill Values for Each Product
- Go to Products in Shopify Admin.
- Open a product.
- Scroll to the Metafields section.
- Enter the values for that product (e.g., Brand = Mason, Weight = 5kg).
- Save.
- Repeat for each product.
Step 3: Display the Table in the Product Template
- Go to Online Store > Themes > Customize.
- Open your Product template.
- Add a Custom Liquid block where you want the table to appear.
- Insert code like this:
<table class="table-striped" style="table-layout: fixed; width: 100%;">
  <tbody>
    {% if product.metafields.custom.brand != blank %}
    <tr>
      <th>Brand</th>
      <td>{{ product.metafields.custom.brand }}</td>
    </tr>
    {% endif %}

    {% if product.metafields.custom.dimensions != blank %}
    <tr>
      <th>Dimensions</th>
      <td>{{ product.metafields.custom.dimensions }}</td>
    </tr>
    {% endif %}

    {% if product.metafields.custom.year != blank %}
    <tr>
      <th>Year</th>
      <td>{{ product.metafields.custom.year }}</td>
    </tr>
    {% endif %}

    {% if product.metafields.custom.seat_height != blank %}
    <tr>
      <th>Seat Height</th>
      <td>{{ product.metafields.custom.seat_height }}</td>
    </tr>
    {% endif %}

    {% if product.metafields.custom.weight != blank %}
    <tr>
      <th>Weight</th>
      <td>{{ product.metafields.custom.weight }}</td>
    </tr>
    {% endif %}
  </tbody>
</table>
- Replace
customwith the actual namespace you used when creating your metafields (e.g.,specs.brand). - The
!= blankcondition ensures the row is only shown if the product metafield has a value. - This way, you can create a consistent table layout for all products, but rows will only appear where data is available.
Method 2: Page Metafield
When to use this method
- Each product requires a different or complex table.
- You want full control of the table structure (e.g., extra notes, merged cells).
- Your catalog is small to medium, so creating one Page per product is manageable.
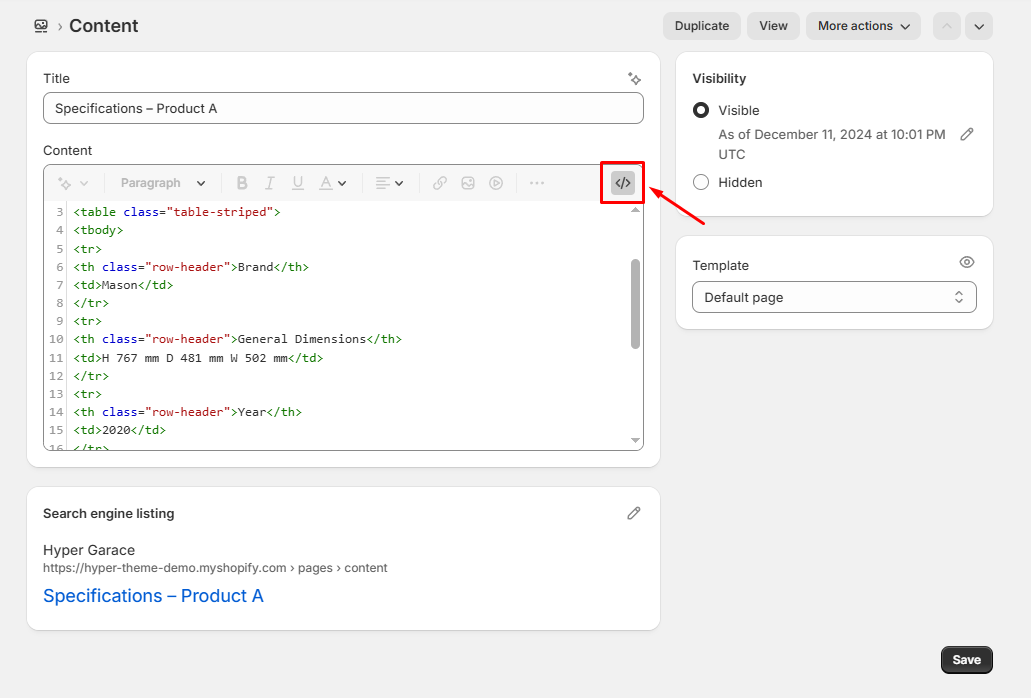
Step 1: Create a Specifications Page
- In Shopify Admin, go to Online Store > Pages.
- Click Add Page.
- Give the page a clear name, for example:
- "Specifications – Product A"
- "Specifications – Product B"
- In the content editor:
- Use the Insert Table option, or
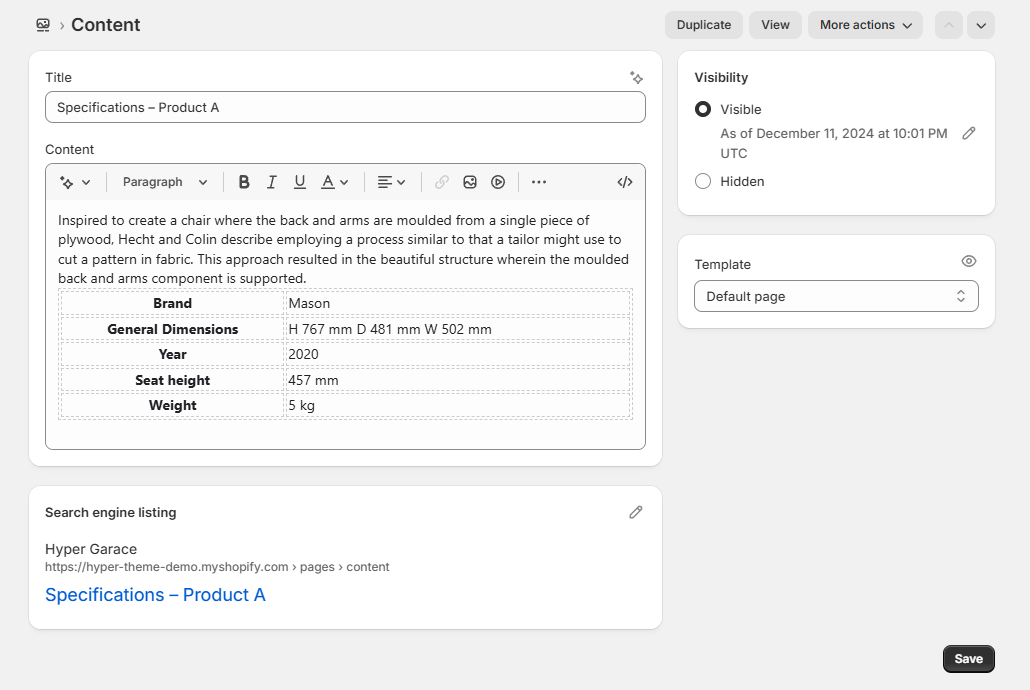
- Switch to HTML view and paste a table structure like this:
<table class="table-striped">
  <tr>
    <th>Brand</th>
    <td>Mason</td>
  </tr>
  <tr>
    <th>Dimensions</th>
    <td>H 767 mm × W 502 mm × D 481 mm</td>
  </tr>
  <tr>
    <th>Year</th>
    <td>2020</td>
  </tr>
  <tr>
    <th>Weight</th>
    <td>5 kg</td>
  </tr>
</table>
- Save the page.
- Repeat this process for every product that requires a unique table.
Step 2: Create a Page Metafield
- Go to Shopify Admin > Settings > Custom data > Products.
- Click Add definition.
- Fill in the details:
- Name: Specifications Page
- Namespace and key:
custom.specifications_page(you can choose your own, but this is a good convention). - Content type: Page (One page).
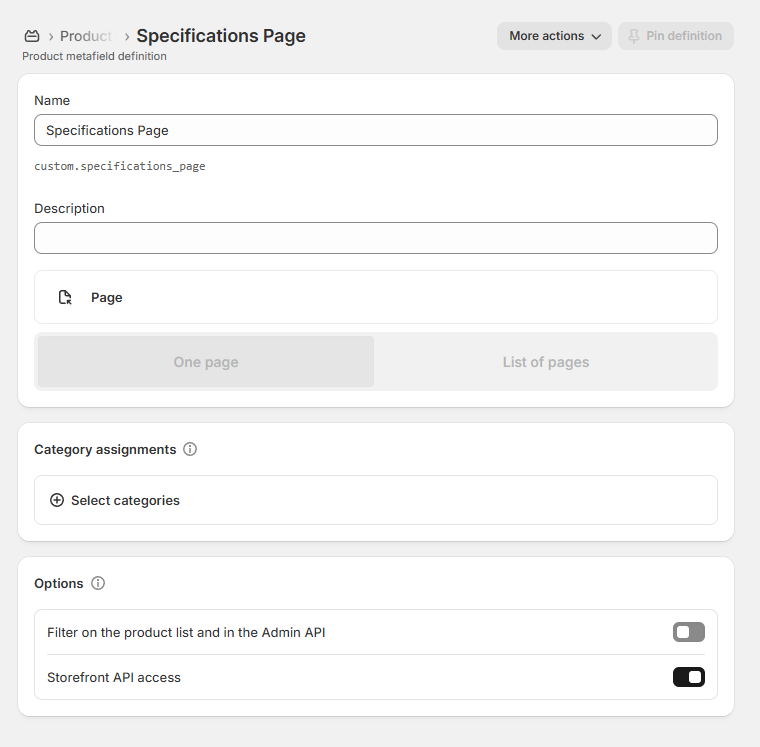
- Click Save.
Step 3: Link the Page to Each Product
- In Shopify Admin, go to Products.
- Open a product that needs specifications.
- Scroll down to the Metafields section.
- You’ll see the new metafield (e.g., Specifications Page).
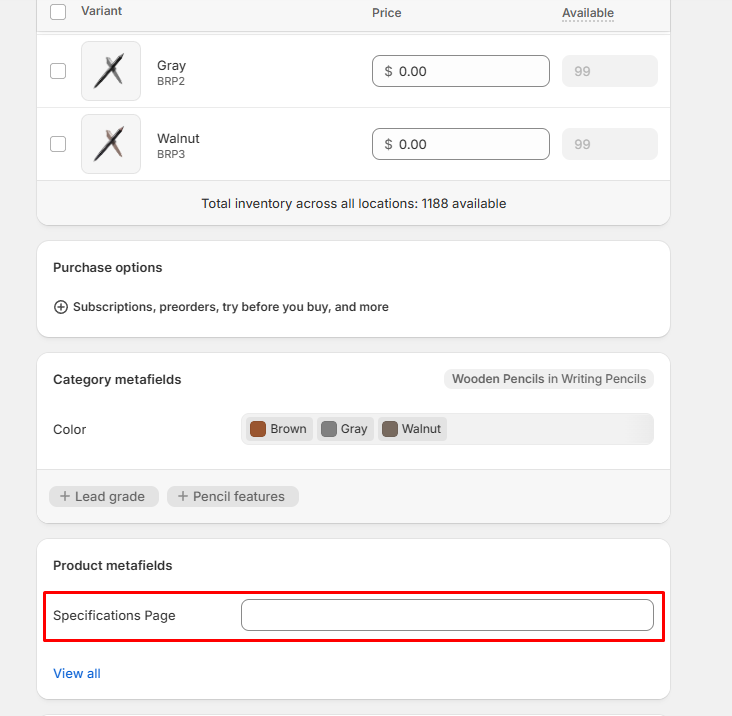
- From the dropdown, select the correct Page you created earlier (e.g., "Specifications – Product A").

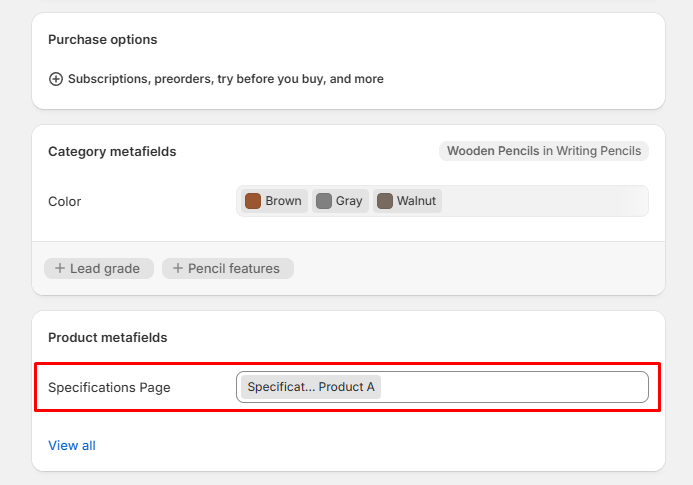
- Click Save.
- Repeat for all products.
Step 4: Display the Page in the Product Template
- Go to Online Store > Themes > Customize.
- Open your Product template.
- Locate the section where you want the specifications table to appear.
- Add a new Custom Liquid block. Inside the Custom Liquid block, please paste the following code:
{{ product.metafields.custom.specifications_page.value.content }}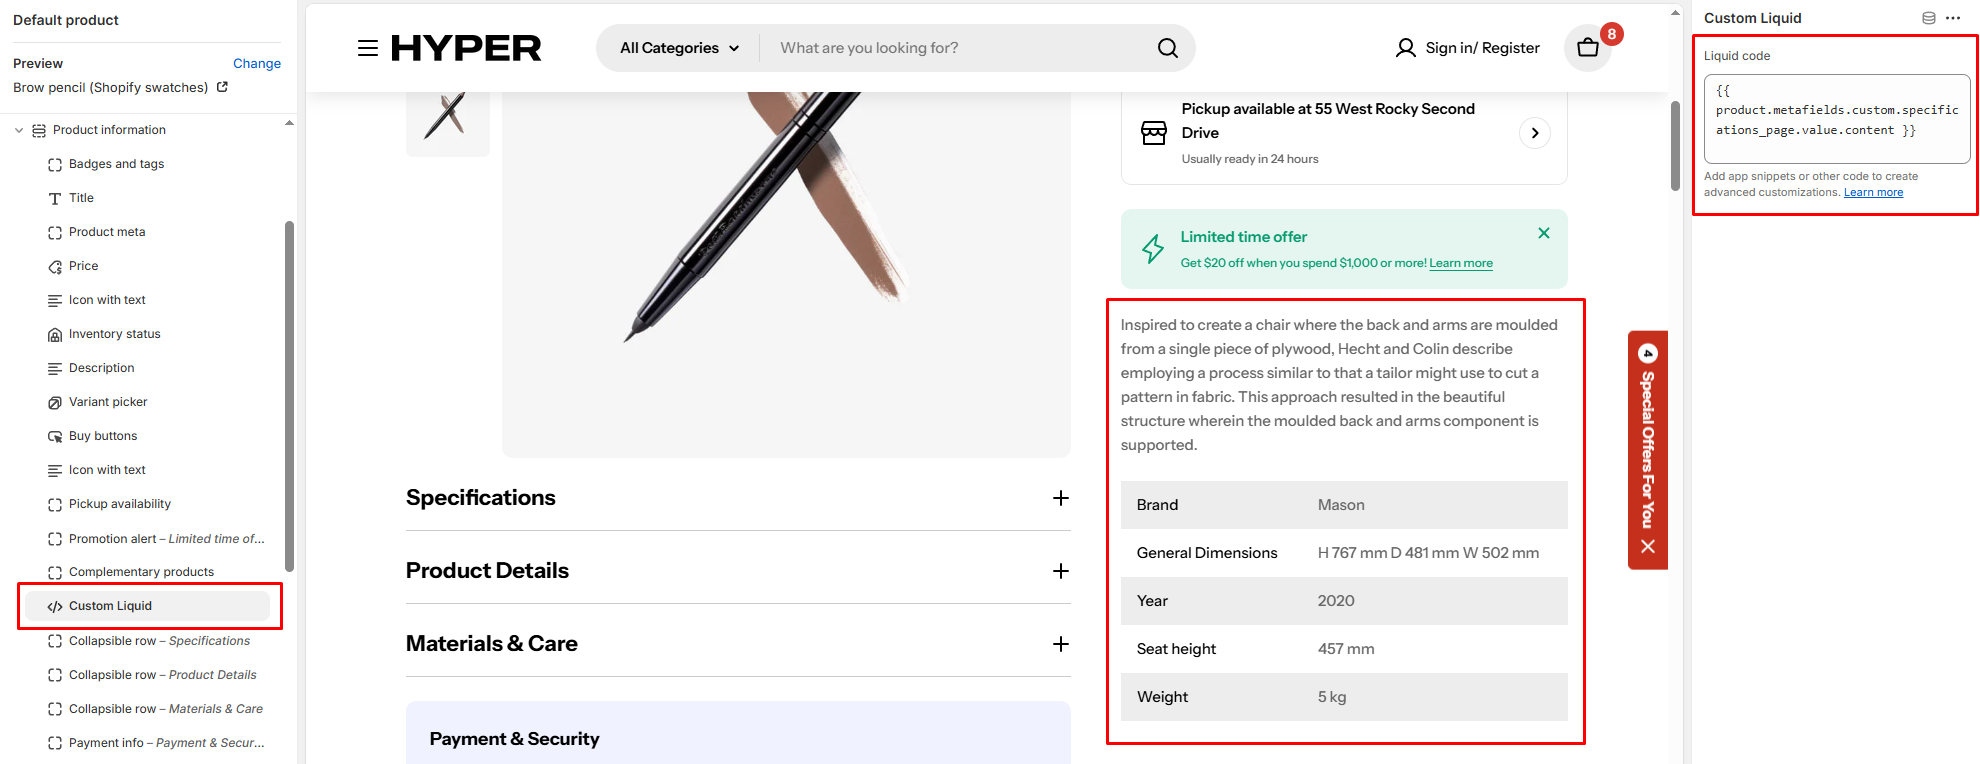
- Otherwise, if your theme has a "Collapsible Row - Specifications" block or similar block, you can use that.
- Click the Dynamic Source icon ().
- Select your metafield: Specifications Page.
- Save your changes.
Last updated