# Show Payment icons

<figure><img src="https://3026705042-files.gitbook.io/~/files/v0/b/gitbook-x-prod.appspot.com/o/spaces%2FAJrvmfqcj9TMoPkl3bNc%2Fuploads%2FPrVH17XY7gTUTVtdSVMt%2FHyper%20docs%20screenshot%20do%20not%20delete%20(100).jpg?alt=media&#x26;token=51c55b53-d993-44a0-a9eb-b2e3c35435c3" alt=""><figcaption></figcaption></figure>

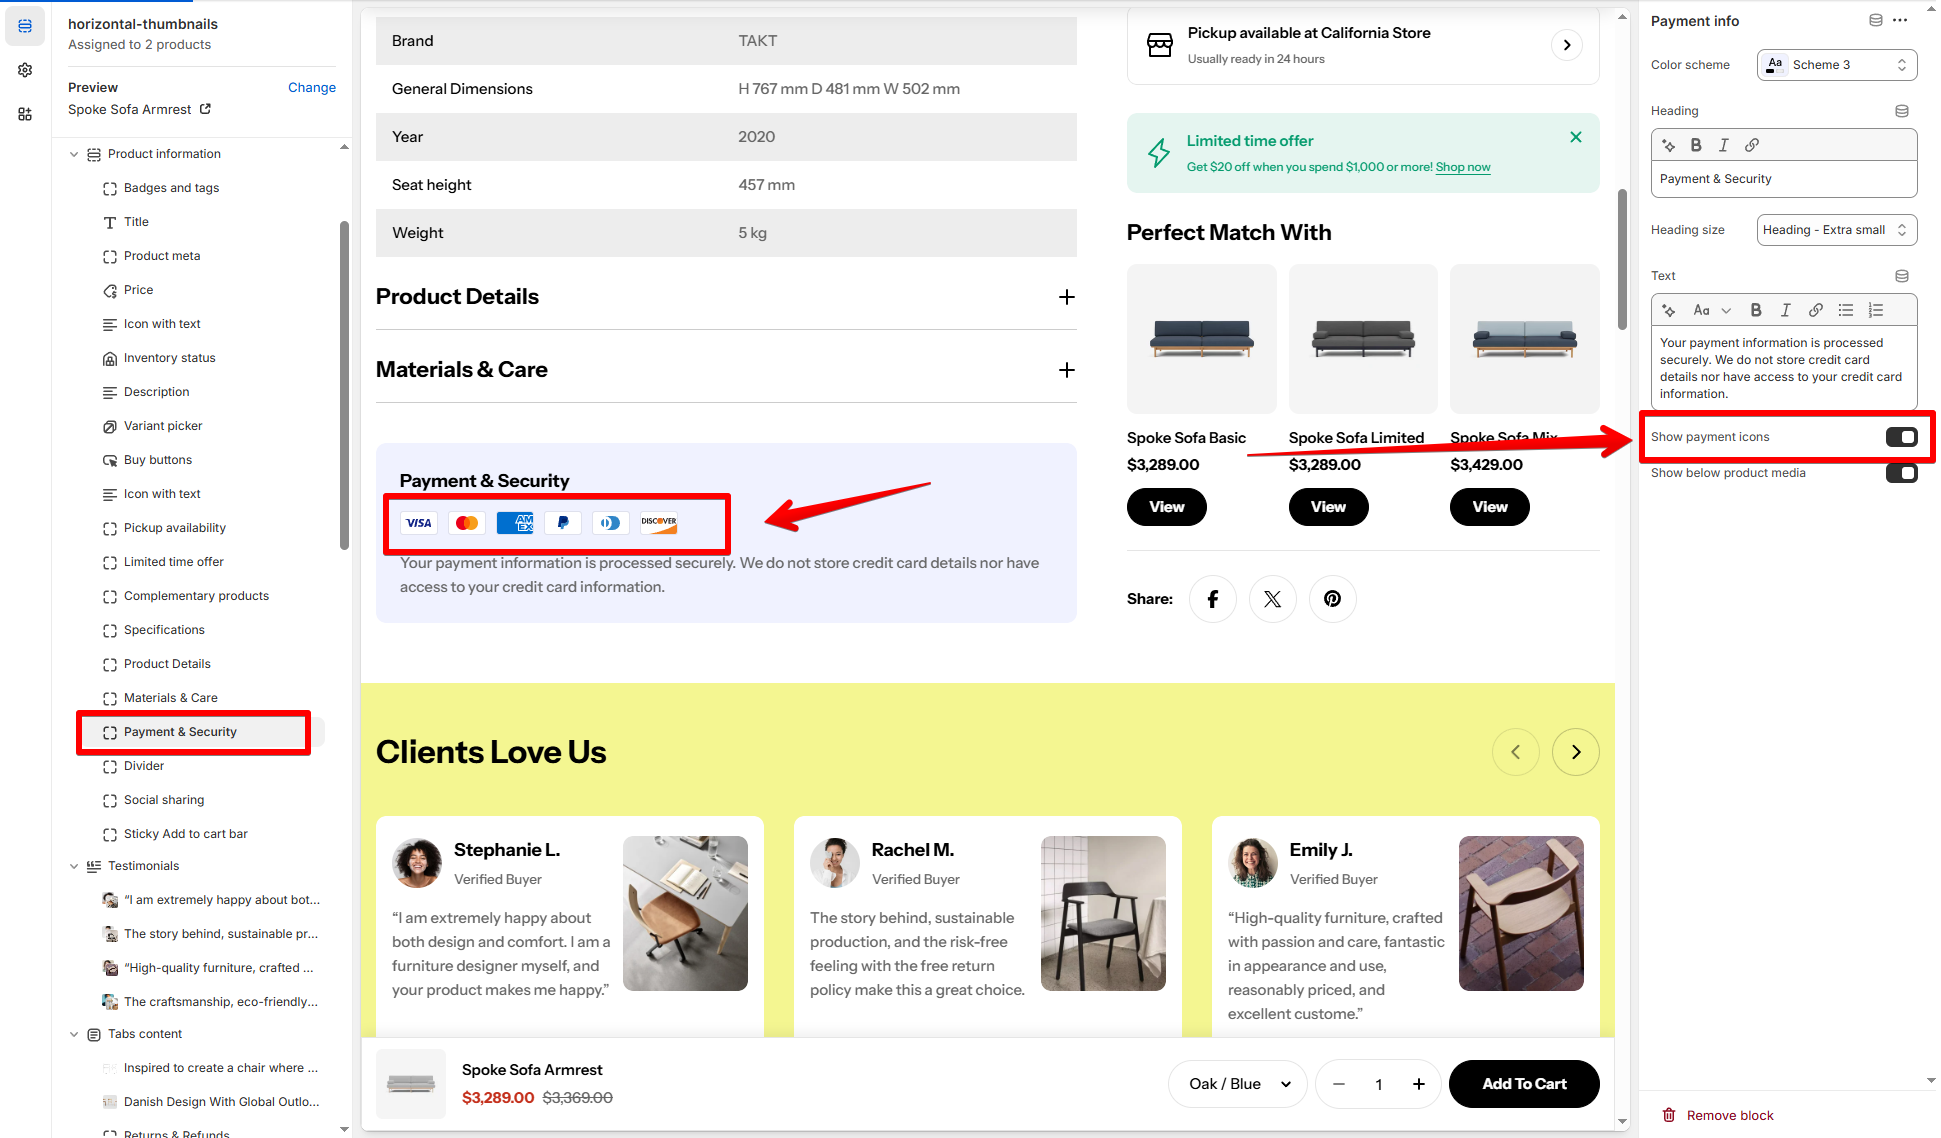
## **How to show the payment icons**

Payment icons can be displayed on:

* **Product page > Product information section > Payment info** block.

<figure><img src="https://3026705042-files.gitbook.io/~/files/v0/b/gitbook-x-prod.appspot.com/o/spaces%2FAJrvmfqcj9TMoPkl3bNc%2Fuploads%2FoV0FaIL2tAkn9UFgADgb%2Fimage.png?alt=media&#x26;token=0bcfc9d9-c2fd-4692-88fa-c9bfdc99dc9d" alt=""><figcaption></figcaption></figure>

* **Footer**

<figure><img src="https://3026705042-files.gitbook.io/~/files/v0/b/gitbook-x-prod.appspot.com/o/spaces%2FAJrvmfqcj9TMoPkl3bNc%2Fuploads%2FQjaIStSvx9RatmsfbW8B%2Fimage.png?alt=media&#x26;token=ade7aabb-5dee-4129-94ee-09db93e49cfe" alt=""><figcaption></figcaption></figure>

## Why are icons not showing up/ missing&#x20;

**Only payment options accepted through** **Shopify Payments** will automatically display their icons in the footer.

:writing\_hand: [Learn more about Shopify Payments here](https://help.shopify.com/manual/payments/shopify-payments).

**What Can You Do?**

* Contact Shopify Support: For the latest information and potential workarounds, we suggest you contact Shopify Support. They can provide the most up-to-date details on the payment method icon display.
* Theme Customization: If you're comfortable with code editing, Hyper theme allows manual customization of the footer section to display icons for third-party gateways.&#x20;

## Choose which payment icons to display

If you want to add or remove payment icons in the Footer without changing your payment settings, then you can edit your theme code by following our steps below.

### **Make sure you enable the payment icons in your Footer**

1. Go to the [theme editor](https://admin.shopify.com/themes/current/editor).
2. Click **Footer**.
3. Check the **Show payment icons** checkbox.
4. Click **Save**.

### **Edit the code for your payment icons**

In this step, you will change the way that payment icons are assigned to your Footer.

By default, your theme shows icons associated with the payment gateway you have enabled in the Shopify payments settings.

With this customization, you can manually add or remove the payment icons that you want to display.

Steps:

1. From your Shopify admin, go to **Online Store** > **Themes**.
2. Find the theme you want to edit, click the … button to open the actions menu, and then click **Edit code**.
3. In the **Sections** directory, click **footer.liquid**. Find the following code in the file:

```
{%- for type in shop.enabled_payment_types -%}
```

<figure><img src="https://3026705042-files.gitbook.io/~/files/v0/b/gitbook-x-prod.appspot.com/o/spaces%2FAJrvmfqcj9TMoPkl3bNc%2Fuploads%2FrCmuxjLpGbMyA8xAShRZ%2Fimage.png?alt=media&#x26;token=15dd4aaf-6a89-4d6c-a11d-1db516d2acd0" alt=""><figcaption></figcaption></figure>

Replace that code with the following:

```
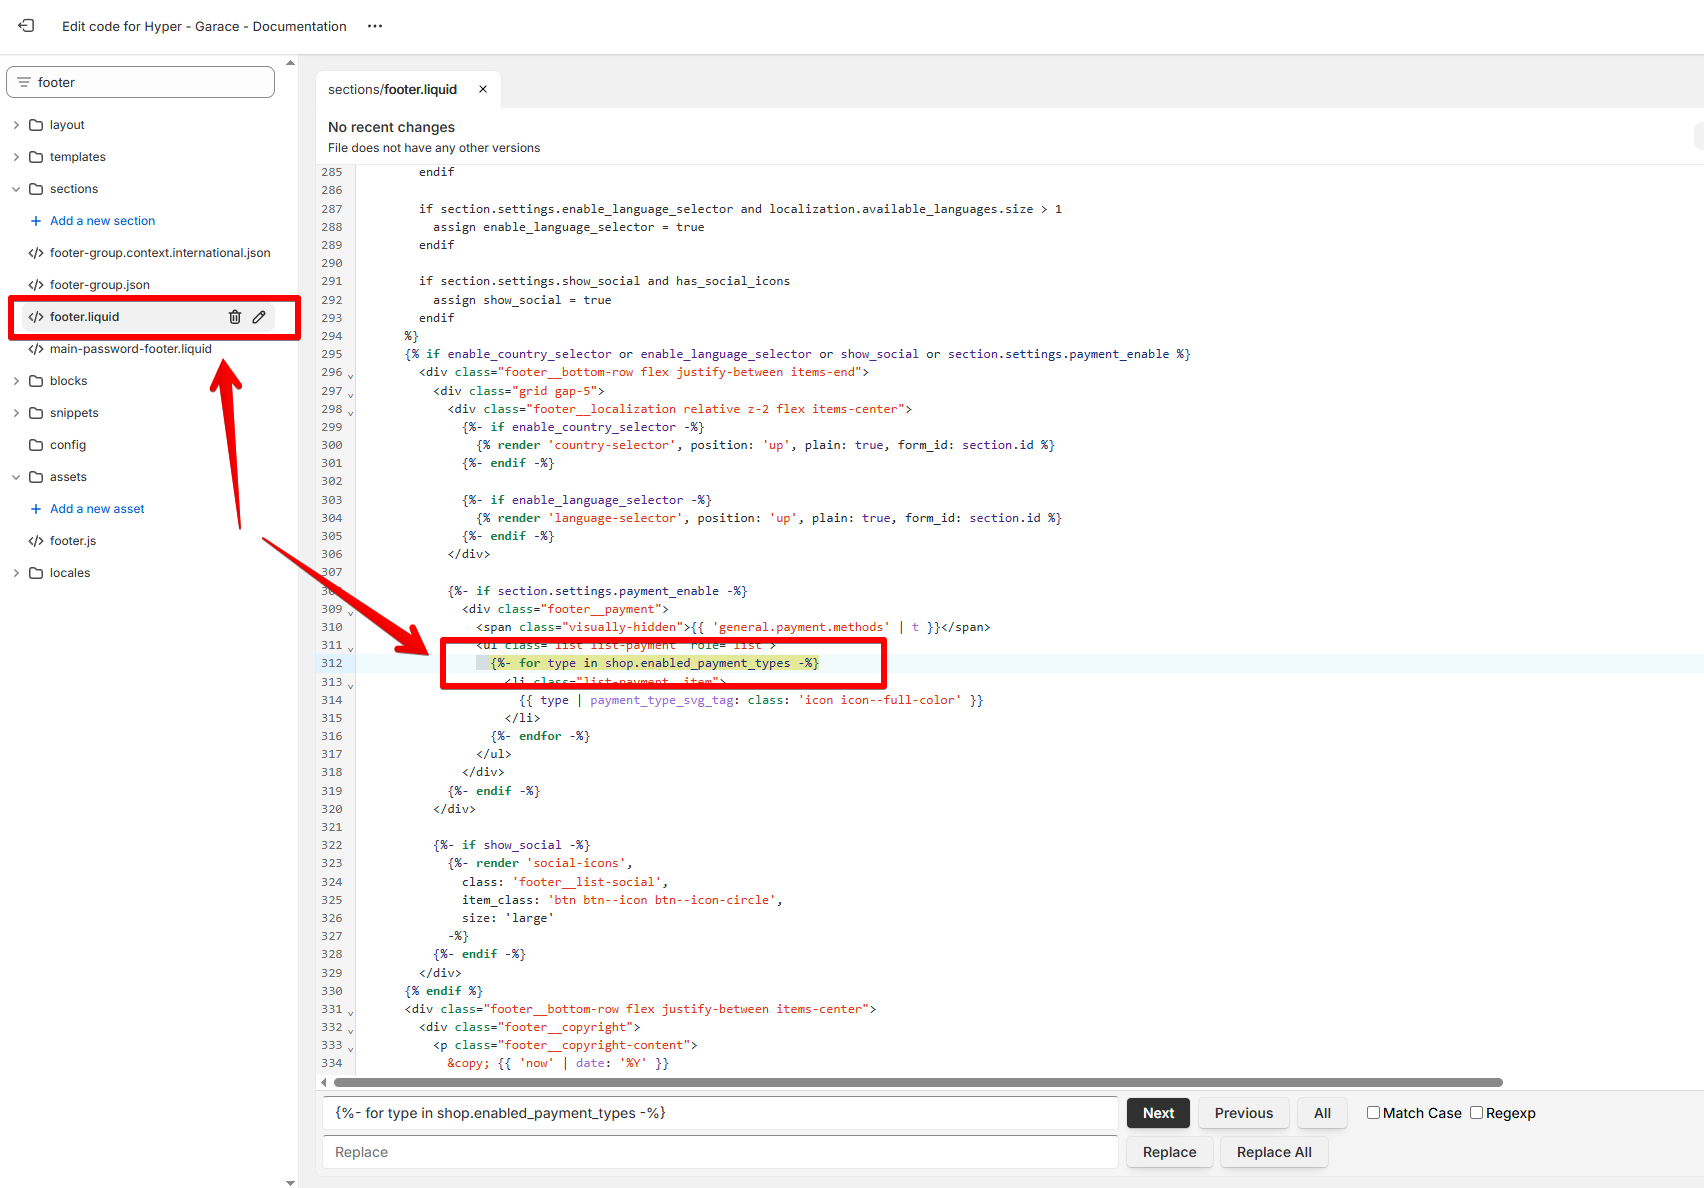
{% assign enabled_payment_types = 'visa,master,american_express,paypal' | remove: ' ' | split: ',' %}
{% for type in enabled_payment_types %}
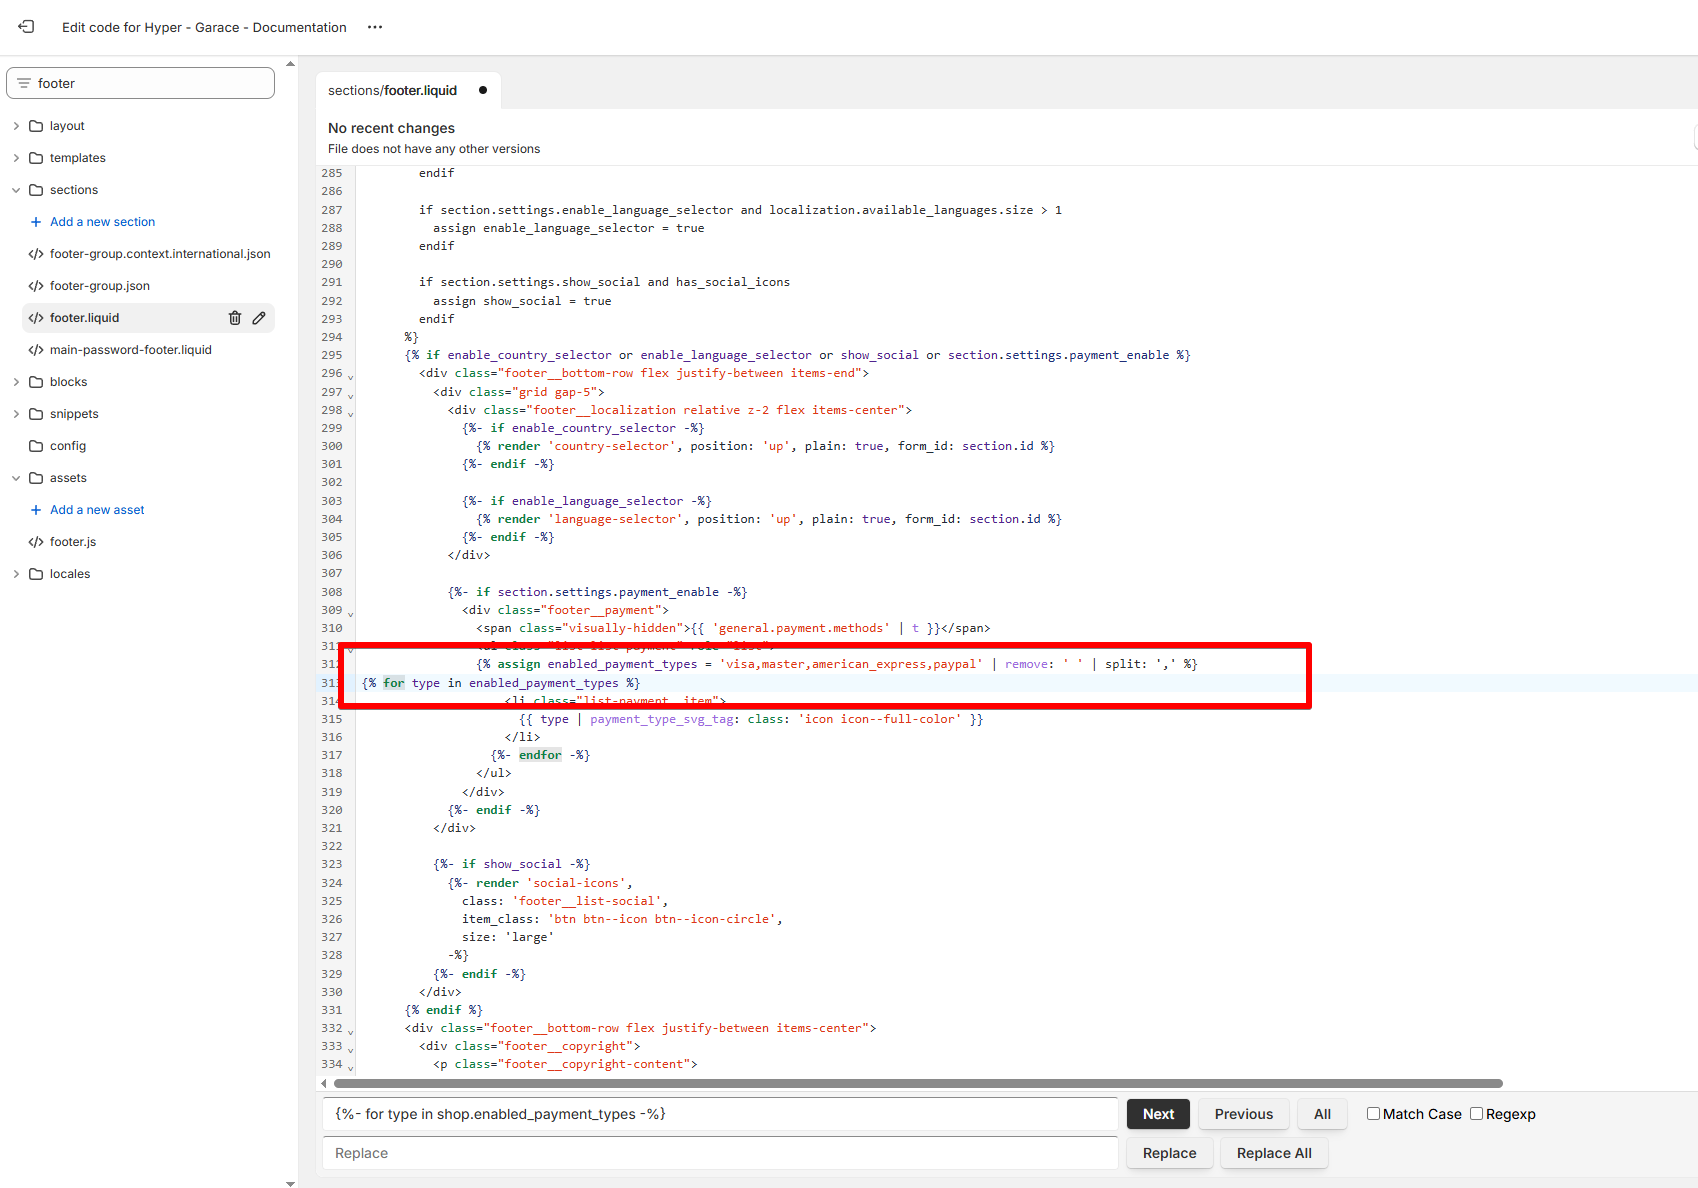
```

<figure><img src="https://3026705042-files.gitbook.io/~/files/v0/b/gitbook-x-prod.appspot.com/o/spaces%2FAJrvmfqcj9TMoPkl3bNc%2Fuploads%2F9N3sUm7Z3oXo9lpSPFE1%2Fimage.png?alt=media&#x26;token=74e759bd-4c0c-480b-9044-88c4bc31262a" alt=""><figcaption></figcaption></figure>

In the code that you just pasted, there is a list of payment providers separated by commas:

```
 'visa,master,american_express,paypal'
```

The payment providers that you include in this list will determine which payment icons shown on your online store.

You can edit the list of payment providers to suit your needs.

[Review the list of available values](https://github.com/activemerchant/payment_icons/tree/master/app/assets/images/payment_icons) and copy the icon's name that you need from that list, **without the .svg extension**.

***

<figure><img src="https://3026705042-files.gitbook.io/~/files/v0/b/gitbook-x-prod.appspot.com/o/spaces%2FAJrvmfqcj9TMoPkl3bNc%2Fuploads%2FkUIzEsJKOeRiz891zyf5%2Flivechat883x471%20(1).png?alt=media&#x26;token=90cbed2c-e791-49c8-9f43-49a08bed6f1f" alt=""><figcaption><p><a href="https://apps.shopify.com/xflow?utm_source=foxecom&#x26;utm_medium=hyper_helpdocs&#x26;utm_campaign=banner">Install XFlow Back In Stock Automation FREE</a></p></figcaption></figure>


---

# Agent Instructions: Querying This Documentation

If you need additional information that is not directly available in this page, you can query the documentation dynamically by asking a question.

Perform an HTTP GET request on the current page URL with the `ask` query parameter:

```
GET https://docs.foxecom.com/hyper-theme/faqs/show-payment-icons.md?ask=<question>
```

The question should be specific, self-contained, and written in natural language.
The response will contain a direct answer to the question and relevant excerpts and sources from the documentation.

Use this mechanism when the answer is not explicitly present in the current page, you need clarification or additional context, or you want to retrieve related documentation sections.
