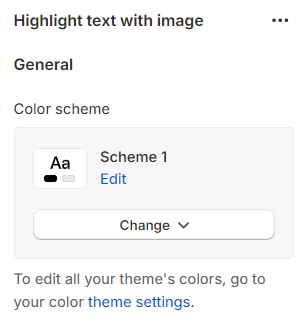
# Highlight text with image

<figure><img src="https://3064615700-files.gitbook.io/~/files/v0/b/gitbook-x-prod.appspot.com/o/spaces%2F3yE7VVjvl0MgK6awOPKB%2Fuploads%2Fq6zyTDG5voccDzqc5jVd%2FGroup%204514.png?alt=media&#x26;token=6c20187a-d9b7-45ac-9cf4-83b7909f9435" alt=""><figcaption></figcaption></figure>

A Highlight text with image section combines text and images to create a visually appealing and engaging section on a webpage.&#x20;

This is often used to draw attention to important information or key points on the website.

In this article, we will show you how to add a Highlight text with image section.

## How to add a **Highlight Text with image section** to your Shopify store

{% hint style="success" %}
Steps

1. In the theme editor **(Customize)**,> click **Add section**
2. Select **Highlight text with image**.
3. Make necessary changes.
4. **Save** the settings.
   {% endhint %}

## How to edit a **Highlight Text with image section**

### Section settings&#x20;

#### General

Adjust the **Color scheme** for this section.

{% hint style="info" %}
In Shopify, the [Color scheme](https://help.shopify.com/en/manual/online-store/themes/theme-structure/color-scheme) (a set of colors) of your store can be set within the [Theme settings](https://help.shopify.com/en/manual/online-store/themes/theme-structure/theme-settings). It helps group elements and their respective colors, making your store visually appealing and cohesive. You can apply the color schemes to different sections throughout your online store with a color scheme picker.&#x20;
{% endhint %}

<figure><img src="https://3064615700-files.gitbook.io/~/files/v0/b/gitbook-x-prod.appspot.com/o/spaces%2F3yE7VVjvl0MgK6awOPKB%2Fuploads%2Ft0AVcRaZlU7s8soSlbtZ%2Fimage.png?alt=media&#x26;token=168c80f7-c775-4f24-a726-b7d8f72fdce0" alt=""><figcaption></figcaption></figure>

#### Text

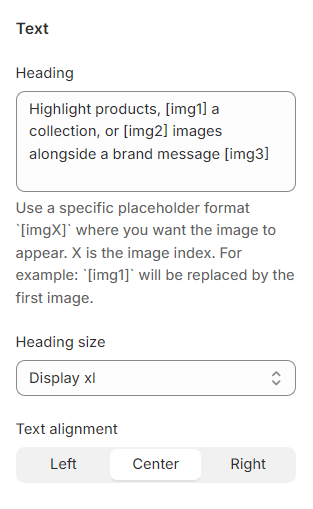
Use the provided text field to add a suitable **Heading**.

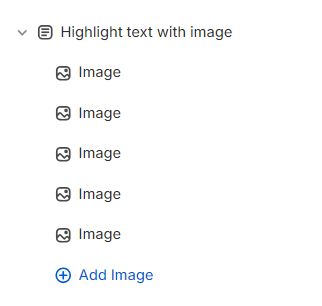
* Leave it blank if you do not want to display it

{% hint style="info" %}
**Note**: Use a specific placeholder format `[imgX]` where you want the image to appear. X is the image index. For example: `[img1]` will be replaced by the first image block.
{% endhint %}

You can also change the **Heading size** to:

* Heading xs
* Heading sm
* Heading md
* Heading lg
* Heading xl
* Heading 2xl
* Display md
* Display lg
* Display xl

And the **Text alignment** to Left/ Center/ Right to make the content look balanced on your website.

<figure><img src="https://3064615700-files.gitbook.io/~/files/v0/b/gitbook-x-prod.appspot.com/o/spaces%2F3yE7VVjvl0MgK6awOPKB%2Fuploads%2FgTr9GmpCyTECDgqokUlD%2Fimage.png?alt=media&#x26;token=c5270c46-1976-4b66-b471-d80fa6849378" alt=""><figcaption></figcaption></figure>

### Block settings

You can add multiple **Image** blocks to **Highlight text with image** section.

<figure><img src="https://3064615700-files.gitbook.io/~/files/v0/b/gitbook-x-prod.appspot.com/o/spaces%2F3yE7VVjvl0MgK6awOPKB%2Fuploads%2Ftkb51HoiFakFah7w00N4%2Fimage.png?alt=media&#x26;token=de176463-6da1-47a2-9b31-c8bb5558b582" alt=""><figcaption></figcaption></figure>

Add an **Image** that you prefer to display on the Highlight text with image section.

Provide that image with a link that directs customers to the target page specified in the **Image link** field.&#x20;

<figure><img src="https://3064615700-files.gitbook.io/~/files/v0/b/gitbook-x-prod.appspot.com/o/spaces%2F3yE7VVjvl0MgK6awOPKB%2Fuploads%2FOGvbzQOXFwUVjrgnZkg4%2Fimage.png?alt=media&#x26;token=460a036a-69d6-4bdc-a448-af6b73966dd5" alt=""><figcaption></figcaption></figure>

<figure><img src="https://3064615700-files.gitbook.io/~/files/v0/b/gitbook-x-prod.appspot.com/o/spaces%2F3yE7VVjvl0MgK6awOPKB%2Fuploads%2FolhjDGWh8elTYbkvcfhX%2Fimage.png?alt=media&#x26;token=f03187ce-447b-4d28-8f54-af7ca1d21e0d" alt=""><figcaption></figcaption></figure>

Moreover, you can also adjust the width of the image on both mobile and desktop.

* **Image width**: 50px - 250px
* **Image width mobile**: 50px - 150px

<figure><img src="https://3064615700-files.gitbook.io/~/files/v0/b/gitbook-x-prod.appspot.com/o/spaces%2F3yE7VVjvl0MgK6awOPKB%2Fuploads%2FNmfciyJFTsFs4BLxPKDb%2Fimage.png?alt=media&#x26;token=a17b53f1-c73a-4864-851f-15d4081adf13" alt=""><figcaption></figcaption></figure>


---

# Agent Instructions: Querying This Documentation

If you need additional information that is not directly available in this page, you can query the documentation dynamically by asking a question.

Perform an HTTP GET request on the current page URL with the `ask` query parameter:

```
GET https://docs.foxecom.com/sleek-theme/theme-sections/highlight-text-with-image.md?ask=<question>
```

The question should be specific, self-contained, and written in natural language.
The response will contain a direct answer to the question and relevant excerpts and sources from the documentation.

Use this mechanism when the answer is not explicitly present in the current page, you need clarification or additional context, or you want to retrieve related documentation sections.
