# Stack elements

{% embed url="<https://youtu.be/LMpM1D2sUUc>" %}

Stacks are containers that group multiple elements together in a horizontal or vertical layout.&#x20;

They act like a flexible canvas within your page, allowing you to precisely position and arrange elements to keep them from overlapping or drifting apart as the screen resizes.

<figure><img src="https://1749964694-files.gitbook.io/~/files/v0/b/gitbook-x-prod.appspot.com/o/spaces%2FfgpgvtRaQLc36GYyIktZ%2Fuploads%2FYs7feZKe3DChODfL9zhh%2Fimage.png?alt=media&#x26;token=2ecff30f-b93a-4969-a1c2-023fde0996de" alt=""><figcaption></figcaption></figure>

## How to create a Stack&#x20;

{% hint style="success" %}
Steps:

1. Click an element that you want to be in the Stack.
2. Hold down the **Shift** key and select the other elements to stack them together.
3. Select the stack direction: **Stack vertical** or **Stack horizontal**. The stack direction can also be set to **Wrap** using the [Inspector panel](#direction).
   {% endhint %}

<figure><img src="https://1749964694-files.gitbook.io/~/files/v0/b/gitbook-x-prod.appspot.com/o/spaces%2FfgpgvtRaQLc36GYyIktZ%2Fuploads%2FnuP8yYnHi25MK50eGFhe%2FUntitled%20design%20(6).gif?alt=media&#x26;token=b0cfe103-4063-4b6d-ad2c-0e36dba7712f" alt=""><figcaption></figcaption></figure>

Pro tip: Quick stack your selected elements vertically by using the keyboard shortcut: **Ctrl +** <img src="https://1749964694-files.gitbook.io/~/files/v0/b/gitbook-x-prod.appspot.com/o/spaces%2FfgpgvtRaQLc36GYyIktZ%2Fuploads%2Fp7ghMylmPbM7mHDYDjGu%2Fpng-transparent-computer-keyboard-enter-key-computer-icons-icon-design-symbol-symbol-miscellaneous-angle-text.png?alt=media&#x26;token=d03fbb09-980b-402d-9601-0ae01059dbed" alt="" data-size="line">**(Enter/ Return)**.

{% hint style="warning" %}

* Once you use a stack, nested elements will be set to auto-space between.
* You can't apply constraints to any elements within the stack. However, you can still apply constraints to the stack itself.

[Learn more about Constraints here](https://docs.foxecom.com/foxify-app/foxstudio/layout-and-styling/constraints).
{% endhint %}

{% hint style="info" %}
To detach an element from a stack, simply select it and drag it out.

To add a new element to a stack, drag it over the stack until you see the blue indicator and drop it.&#x20;

To unstack elements, select the stack in the editor, then clich **Unstack**, or use the keyboard shortcut: Ctrl +  <img src="https://1749964694-files.gitbook.io/~/files/v0/b/gitbook-x-prod.appspot.com/o/spaces%2FfgpgvtRaQLc36GYyIktZ%2Fuploads%2FJrxVOCB1MTvwYnfN6H7N%2F250231-200.png?alt=media&#x26;token=909d8abc-5114-4c6f-87c4-0ba0eab61f12" alt="" data-size="line"> + <img src="https://1749964694-files.gitbook.io/~/files/v0/b/gitbook-x-prod.appspot.com/o/spaces%2FfgpgvtRaQLc36GYyIktZ%2Fuploads%2F21mLAa0yrxaMLNu22VBX%2FBackspaceIcon.svg?alt=media&#x26;token=16d8af38-3c7a-4eb9-9faf-2b3cd463340b" alt="" data-size="line">.
{% endhint %}

<figure><img src="https://1749964694-files.gitbook.io/~/files/v0/b/gitbook-x-prod.appspot.com/o/spaces%2FfgpgvtRaQLc36GYyIktZ%2Fuploads%2FEITZFdQWtJTr4WDpXllc%2Fremovestack-ezgif.com-video-to-gif-converter%20(1).gif?alt=media&#x26;token=c0ca1084-3783-4e49-98ca-16ba8e93830b" alt=""><figcaption></figcaption></figure>

## How to manage a Stack

{% hint style="success" %}
Steps:

1. Select the Stack you want to edit
2. In the **Inspector** panel, make relevant changes to the settings.
   {% endhint %}

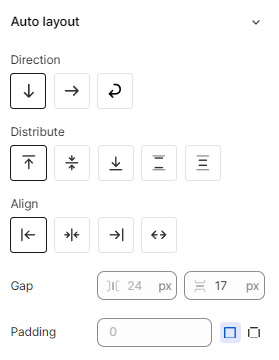
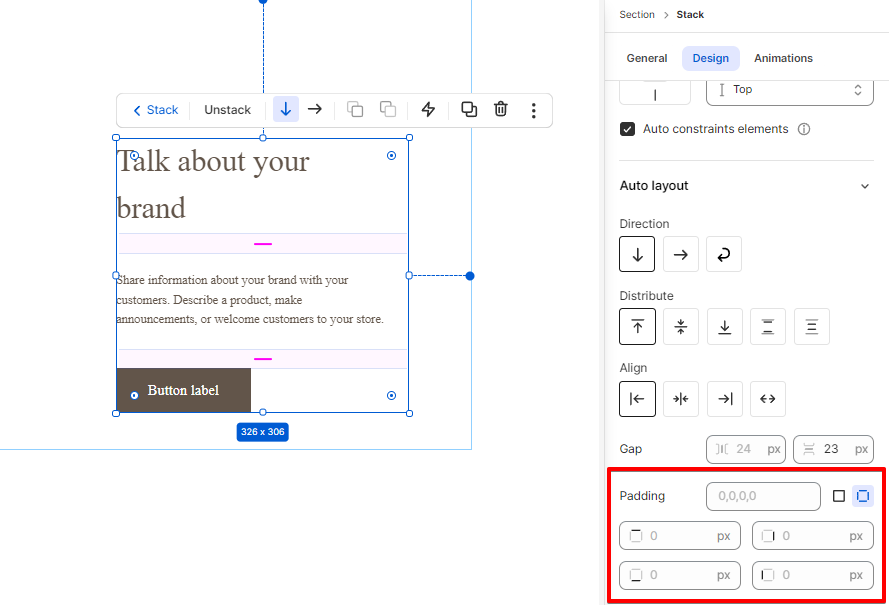
Besides other common settings (colors, backgrounds, effects, etc.), settings specialized for Stack are included in the **Design** tab > **Auto layout**.

<figure><img src="https://1749964694-files.gitbook.io/~/files/v0/b/gitbook-x-prod.appspot.com/o/spaces%2FfgpgvtRaQLc36GYyIktZ%2Fuploads%2FjNfKUjsvOqMYrVHwDFjH%2Fimage.png?alt=media&#x26;token=2faea00c-b2a3-4952-9742-1e2a5db23cca" alt=""><figcaption></figcaption></figure>

* **Direction**: Set the way the stack will flow:
  * <img src="https://1749964694-files.gitbook.io/~/files/v0/b/gitbook-x-prod.appspot.com/o/spaces%2FfgpgvtRaQLc36GYyIktZ%2Fuploads%2F1sllAwocOq3FzFR1E41x%2FArrowDownIcon.svg?alt=media&#x26;token=bf58a2d4-71c8-46e5-b416-28487b929b46" alt="" data-size="line">(Vertical): Add, remove, and reorder objects along the y-axis.
  * <img src="https://1749964694-files.gitbook.io/~/files/v0/b/gitbook-x-prod.appspot.com/o/spaces%2FfgpgvtRaQLc36GYyIktZ%2Fuploads%2F21lXutCYCdeOgomxlIJv%2FArrowRightIcon.svg?alt=media&#x26;token=1989d0c3-6752-4181-9bf0-4b7be8e45470" alt="" data-size="line">(Horizontal): Add, remove, and reorder objects along the x-axis.
  * <img src="https://1749964694-files.gitbook.io/~/files/v0/b/gitbook-x-prod.appspot.com/o/spaces%2FfgpgvtRaQLc36GYyIktZ%2Fuploads%2F9PGfByI7897iW53BiW22%2FReturnIcon%20(1).svg?alt=media&#x26;token=aeb5d8c7-a271-45a0-8318-a9907b6a3e27" alt="" data-size="line">(Wrap):  Arrange objects in multiple rows and columns in a frame. Objects will flow horizontally and wrap to the next line.
* **Distribute:** Set the alignment of the element when stacked horizontally.
* **Align**: Set the alignment of the element when stacked vertically.
* **Gap**: Change the gap (margin) between the rows and columns within the stack.

<figure><img src="https://1749964694-files.gitbook.io/~/files/v0/b/gitbook-x-prod.appspot.com/o/spaces%2FfgpgvtRaQLc36GYyIktZ%2Fuploads%2Fk1jKCqHX9cPYXo0yzpmG%2Fstackautolayout-ezgif.com-video-to-gif-converter.gif?alt=media&#x26;token=1d819349-accb-4d61-9742-c09d683bde41" alt=""><figcaption></figcaption></figure>

If the stack direction is set to vertical or horizontal, you'll be able to set the gap between elements vertically (row gap) or horizontally (column gap), respectively.&#x20;

{% hint style="info" %}
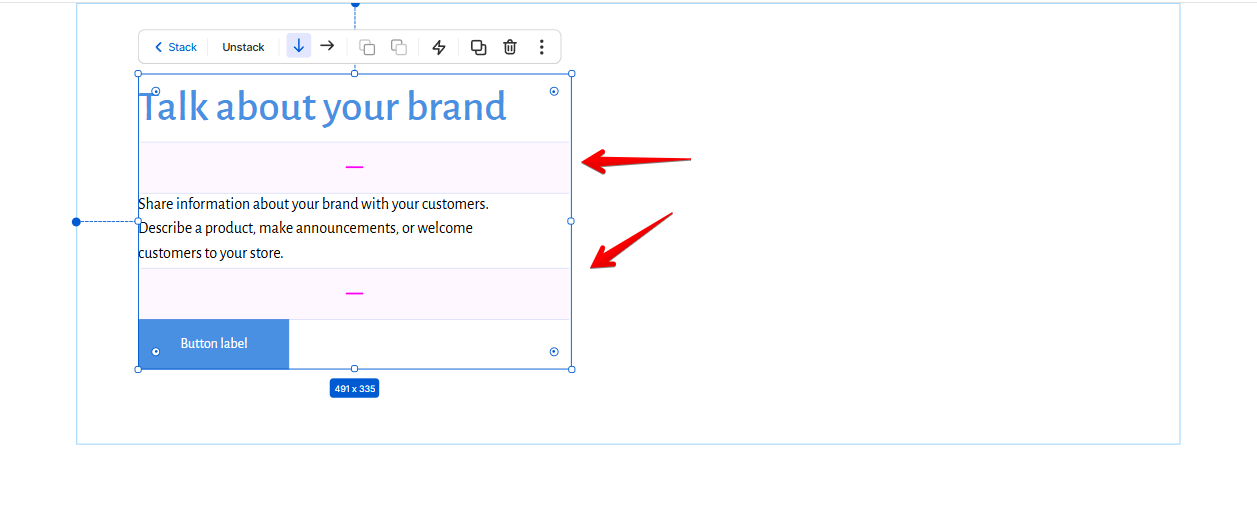
When you select a stack in the editor, the margins between the elements are indicated by the pink strips. Move elements further apart or closer together by dragging these handles to adjust the spacing of all the elements at once.
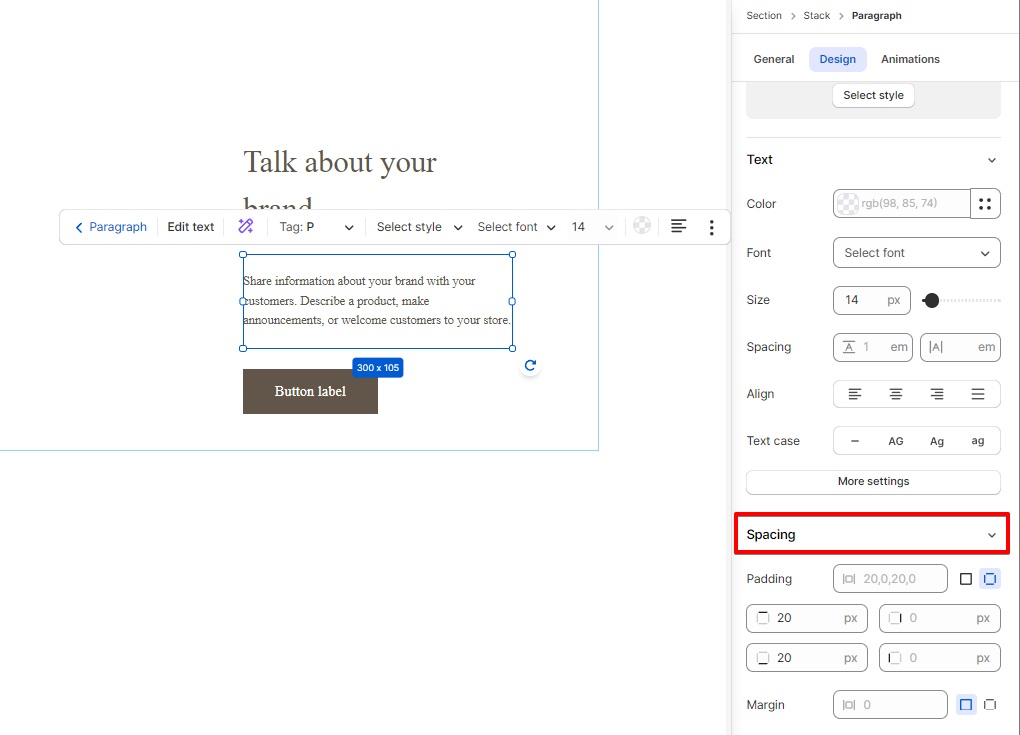
{% endhint %}

<figure><img src="https://1749964694-files.gitbook.io/~/files/v0/b/gitbook-x-prod.appspot.com/o/spaces%2FfgpgvtRaQLc36GYyIktZ%2Fuploads%2FU2HEkX6T7xwPWMiLGbgE%2Fimage.png?alt=media&#x26;token=cfa8ed67-93cd-4bab-8b7a-6c748370ff2c" alt=""><figcaption></figcaption></figure>

{% hint style="info" %}
**Pro tip**: The margins (pink strips) between the elements included in a stack are equally set. If you want to make an element that is further apart from others, you can **set more spacing to that element specifically**.&#x20;

![](https://1749964694-files.gitbook.io/~/files/v0/b/gitbook-x-prod.appspot.com/o/spaces%2FfgpgvtRaQLc36GYyIktZ%2Fuploads%2FbukizjNDLOzV8gMaTAIE%2Fimage.png?alt=media\&token=c9201925-b39a-440b-815d-ebc701cb673d)
{% endhint %}

* **Padding:** Padding controls the empty or white space between the boundary of a stack and the elements within it. You can adjust padding uniformly for all sides, or fine-tune it individually for top, right, bottom, or left.

<figure><img src="https://1749964694-files.gitbook.io/~/files/v0/b/gitbook-x-prod.appspot.com/o/spaces%2FfgpgvtRaQLc36GYyIktZ%2Fuploads%2F6ZjADfYcWMA0pFBYc4nL%2Fimage.png?alt=media&#x26;token=cba7e496-de29-43f4-9fac-2887533e6452" alt=""><figcaption></figcaption></figure>

## Absolute element control

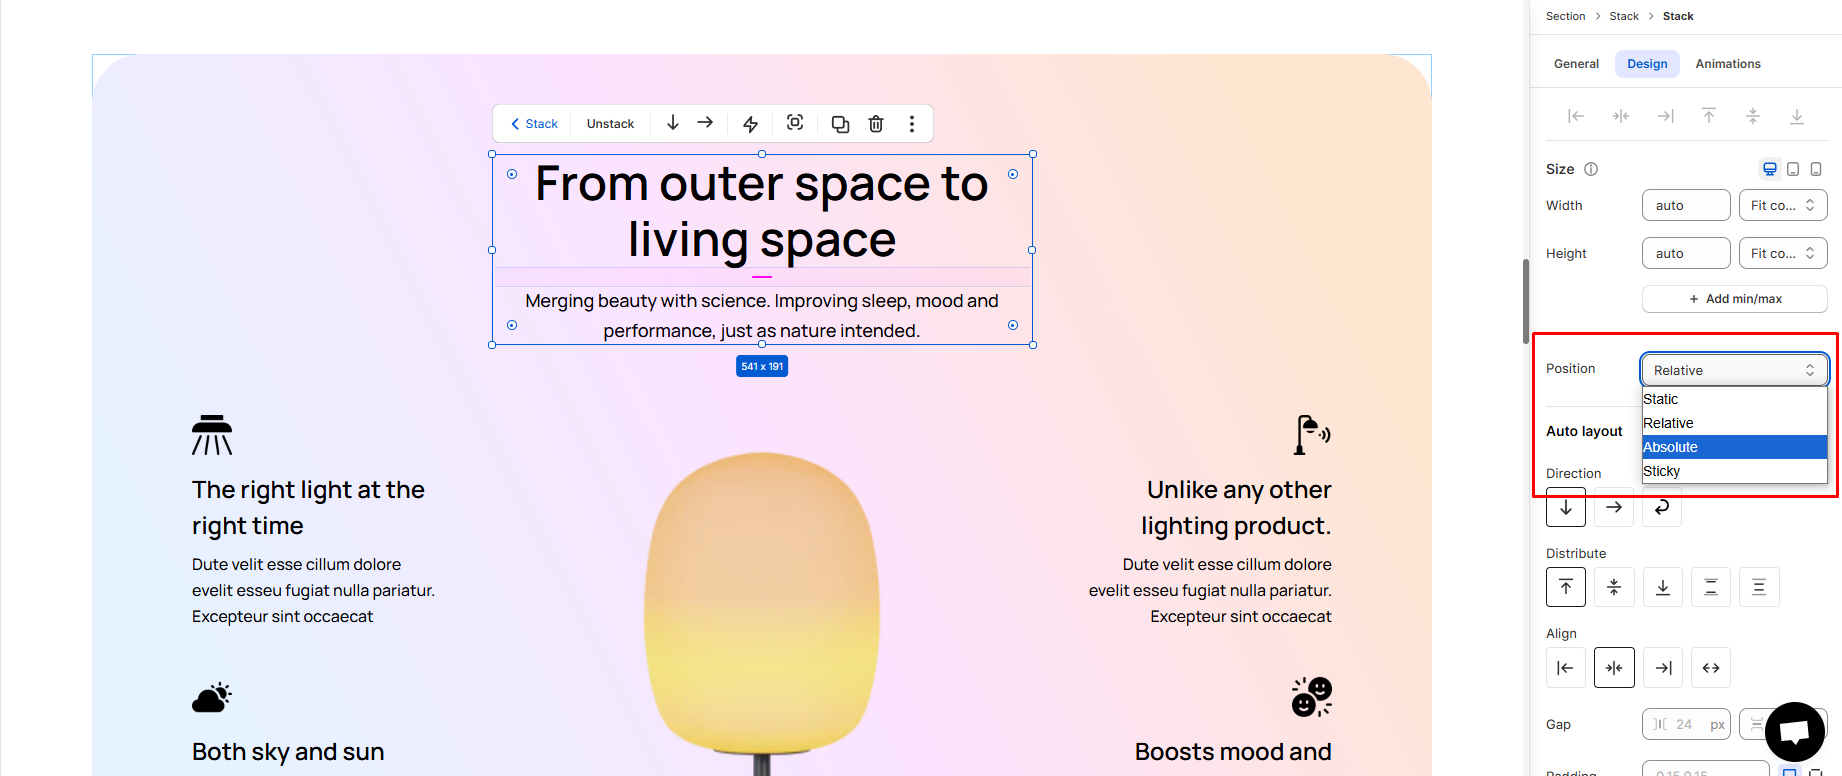
When an element is placed within a Stack (Auto-layout), it cannot be freely repositioned. Instead, it aligns with the direction of the stack. However, enabling the **Absolute Position** option allows you to freely drag and position the element as needed, just like in normal layouts.
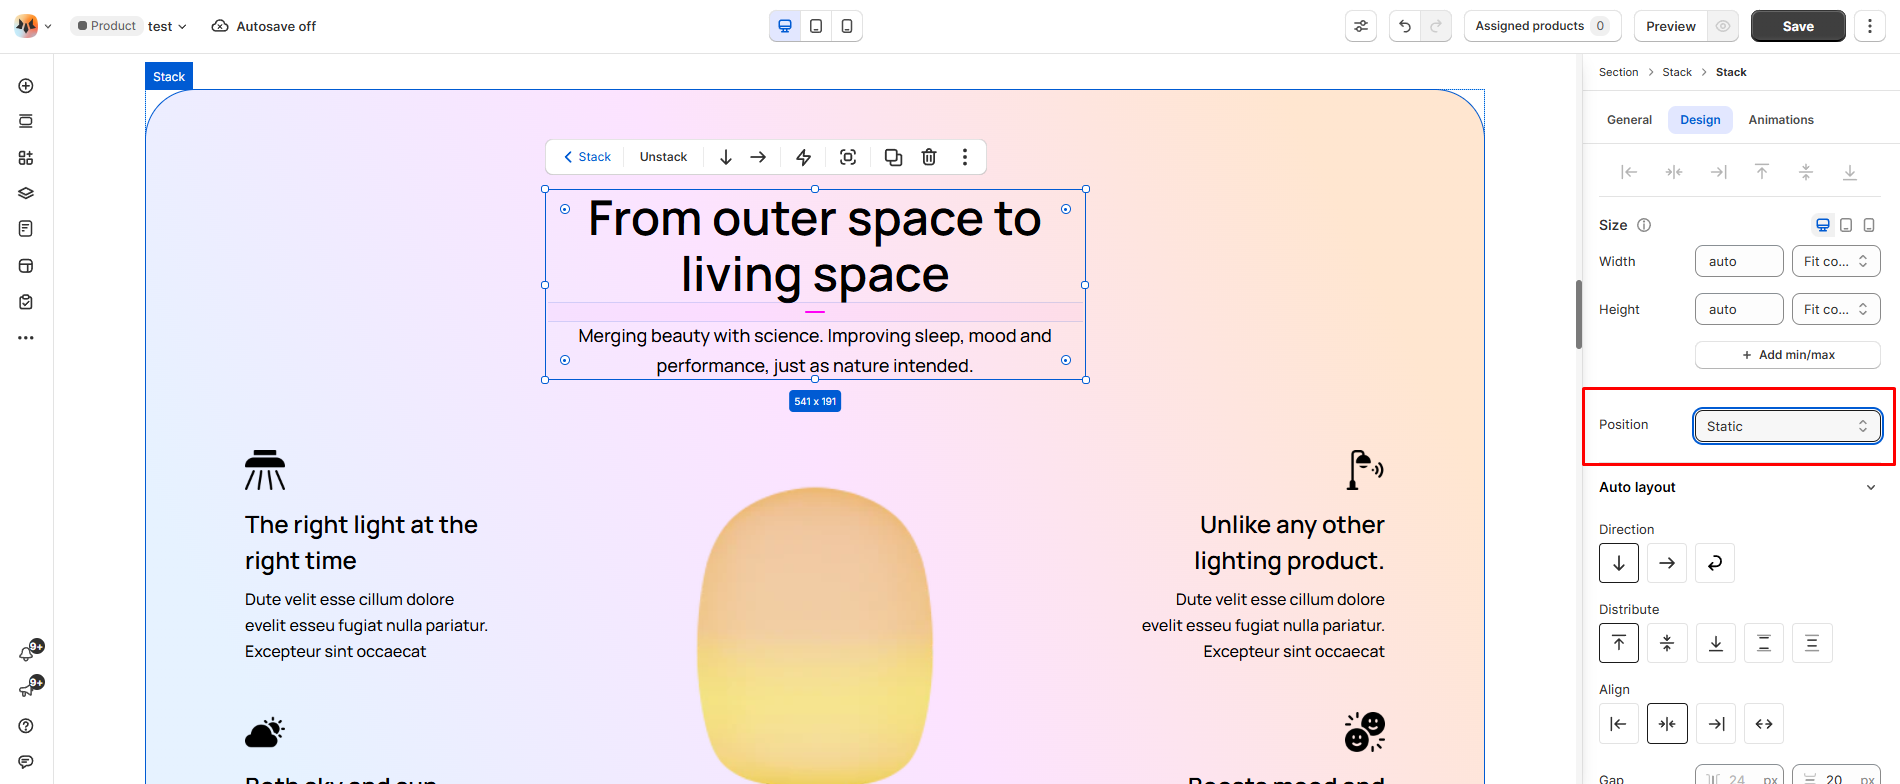
<figure><img src="https://1749964694-files.gitbook.io/~/files/v0/b/gitbook-x-prod.appspot.com/o/spaces%2FfgpgvtRaQLc36GYyIktZ%2Fuploads%2F4cVGxG4rRIWlhqeZrEfa%2Fimage.png?alt=media&#x26;token=8698e6e9-510d-4ff3-9d58-83859cc73371" alt=""><figcaption></figcaption></figure>

{% hint style="success" %}

* **Static:** Default position; follows the normal layout flow.
* **Relative:** Stays in the layout flow but can be moved slightly from its original spot.
* **Absolute:** Removed from the layout flow and positioned relative to its nearest positioned ancestor or the page.
* **Sticky:** Acts like relative but becomes fixed when scrolling reaches a set point (e.g., sticky headers).
  {% endhint %}

{% tabs %}
{% tab title="Static" %}
{% hint style="info" %}
Static position places elements according to the normal flow, without allowing custom positioning adjustments.
{% endhint %}

<figure><img src="https://1749964694-files.gitbook.io/~/files/v0/b/gitbook-x-prod.appspot.com/o/spaces%2FfgpgvtRaQLc36GYyIktZ%2Fuploads%2FqtoFM2GIjINXJRIwWoeP%2Fimage.png?alt=media&#x26;token=04b44da7-84fe-4657-a883-cb06196d2496" alt=""><figcaption></figcaption></figure>
{% endtab %}

{% tab title="Relative" %}
{% hint style="info" %}
Relative position acts as a container for Absolute elements, allowing them to be positioned relative to the container.
{% endhint %}

<figure><img src="https://1749964694-files.gitbook.io/~/files/v0/b/gitbook-x-prod.appspot.com/o/spaces%2FfgpgvtRaQLc36GYyIktZ%2Fuploads%2FCa8oket5wmHsuYYtWhTk%2Frealtive.gif?alt=media&#x26;token=f3f16dc4-0677-43a8-83be-8c58a9047b92" alt=""><figcaption></figcaption></figure>
{% endtab %}

{% tab title="Absolute" %}
{% hint style="info" %}
The Absolute Position option lets you freely drag and position the element, just like in regular layouts.
{% endhint %}

<figure><img src="https://1749964694-files.gitbook.io/~/files/v0/b/gitbook-x-prod.appspot.com/o/spaces%2FfgpgvtRaQLc36GYyIktZ%2Fuploads%2FWTpVbKvEFprbvci9joDO%2Fabsolute.gif?alt=media&#x26;token=0bcbf37a-6e16-455f-9a4f-e6e89ee65a5a" alt=""><figcaption></figcaption></figure>
{% endtab %}

{% tab title="Sticky" %}
{% hint style="info" %}
You can customize the spacing of a sticky element by adjusting the Inset setting.
{% endhint %}

<figure><img src="https://1749964694-files.gitbook.io/~/files/v0/b/gitbook-x-prod.appspot.com/o/spaces%2FfgpgvtRaQLc36GYyIktZ%2Fuploads%2FazmifJWnQZJL4L5SO1bB%2Fsticky.gif?alt=media&#x26;token=c2fb0c5d-3055-41b7-9078-62ece8ea3604" alt=""><figcaption></figcaption></figure>
{% endtab %}
{% endtabs %}


---

# Agent Instructions: Querying This Documentation

If you need additional information that is not directly available in this page, you can query the documentation dynamically by asking a question.

Perform an HTTP GET request on the current page URL with the `ask` query parameter:

```
GET https://docs.foxecom.com/foxify-app/foxstudio/layout-and-styling/stack-elements.md?ask=<question>
```

The question should be specific, self-contained, and written in natural language.
The response will contain a direct answer to the question and relevant excerpts and sources from the documentation.

Use this mechanism when the answer is not explicitly present in the current page, you need clarification or additional context, or you want to retrieve related documentation sections.
