# Create a Theme Section
Build a custom section in Foxify and add it to any page in your Shopify theme editor, without touching code.
**From v5.3.0**: New sections now open in [FoxStudio](https://docs.foxecom.com/foxify-app/foxstudio/overview) editor. If you have sections created before v5.3.0, those will continue to open in Legacy editor when you edit them.
See [our Changelog](https://docs.foxecom.com/foxify-app/changelog).
## Section types
When creating a section, choose the type that fits your use case:
| Type | How it works | Best for |
| --------------- | ----------------------------------------------------------------------------------------------------------------------------------- | -------------------------------------------------------------------- |
| Static section | Content and layout managed in Foxify. One section design appears on all pages it's added to. Update once, updates everywhere. | Testimonials, review walls, FAQ sections, global promotional banners |
| Dynamic section | Layout managed in Foxify, but editable content per-page in Shopify Theme Editor. Same design, different content on different pages. | Product-specific callouts, page-specific announcements. |
Not sure which to pick? Start with **Static** — it's simplier and works for most use cases. Switch to **Dynamic** if you need different content on different pages.
## Create a theme section with Foxify
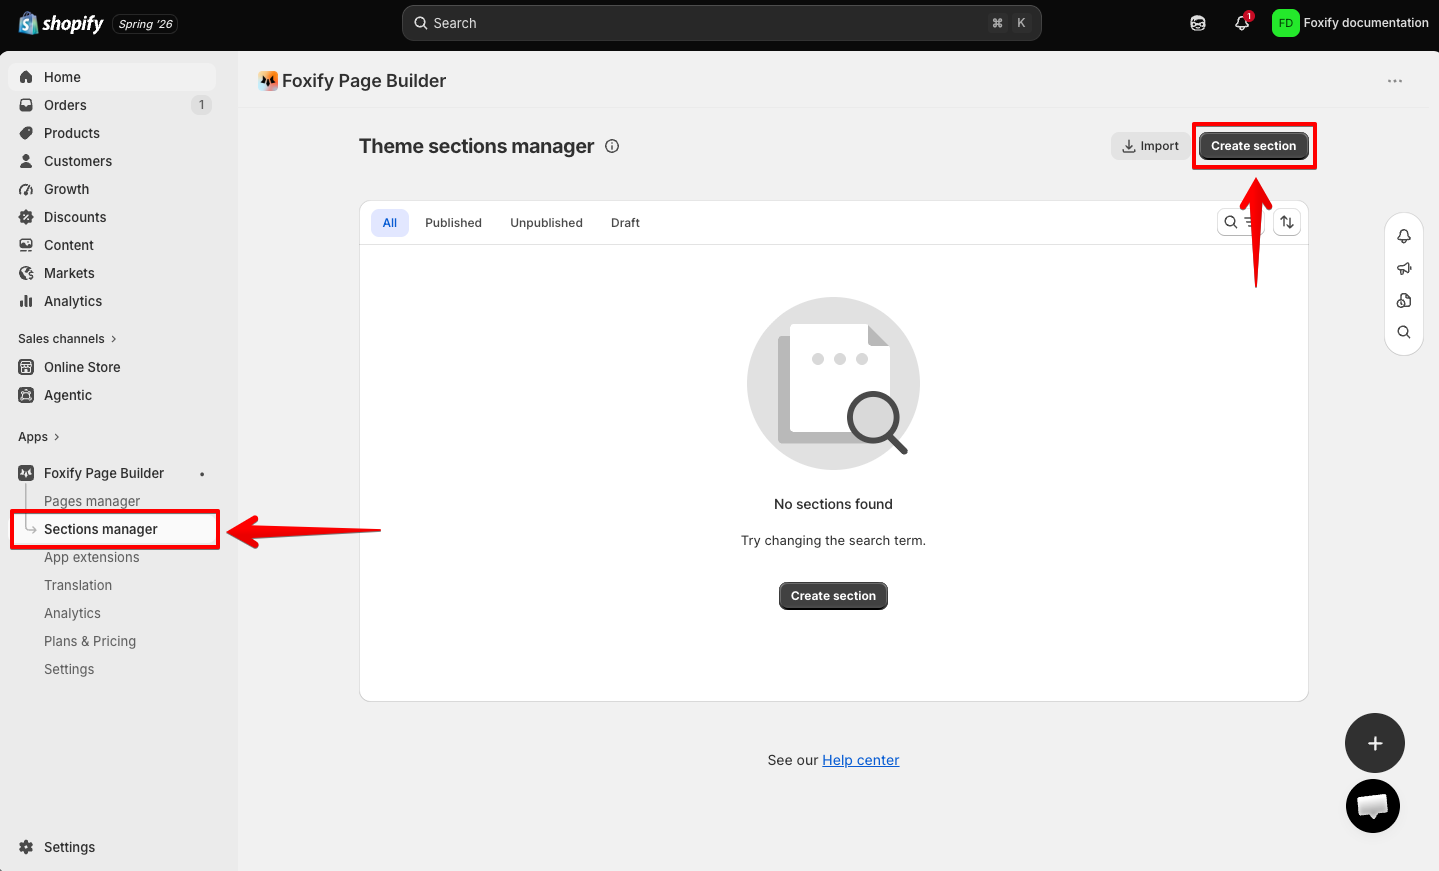
1. In the Foxify left sidebar, go to **Sections mananger**.
2. Click **Create section**.
3. Choose a **pre-designed section** for a quick start, or **start from blank**.
4. Customize your section in the editor.
Learn more: [Add and edit elements](https://docs.foxecom.com/foxify-app/foxstudio/add-and-edit-elements)
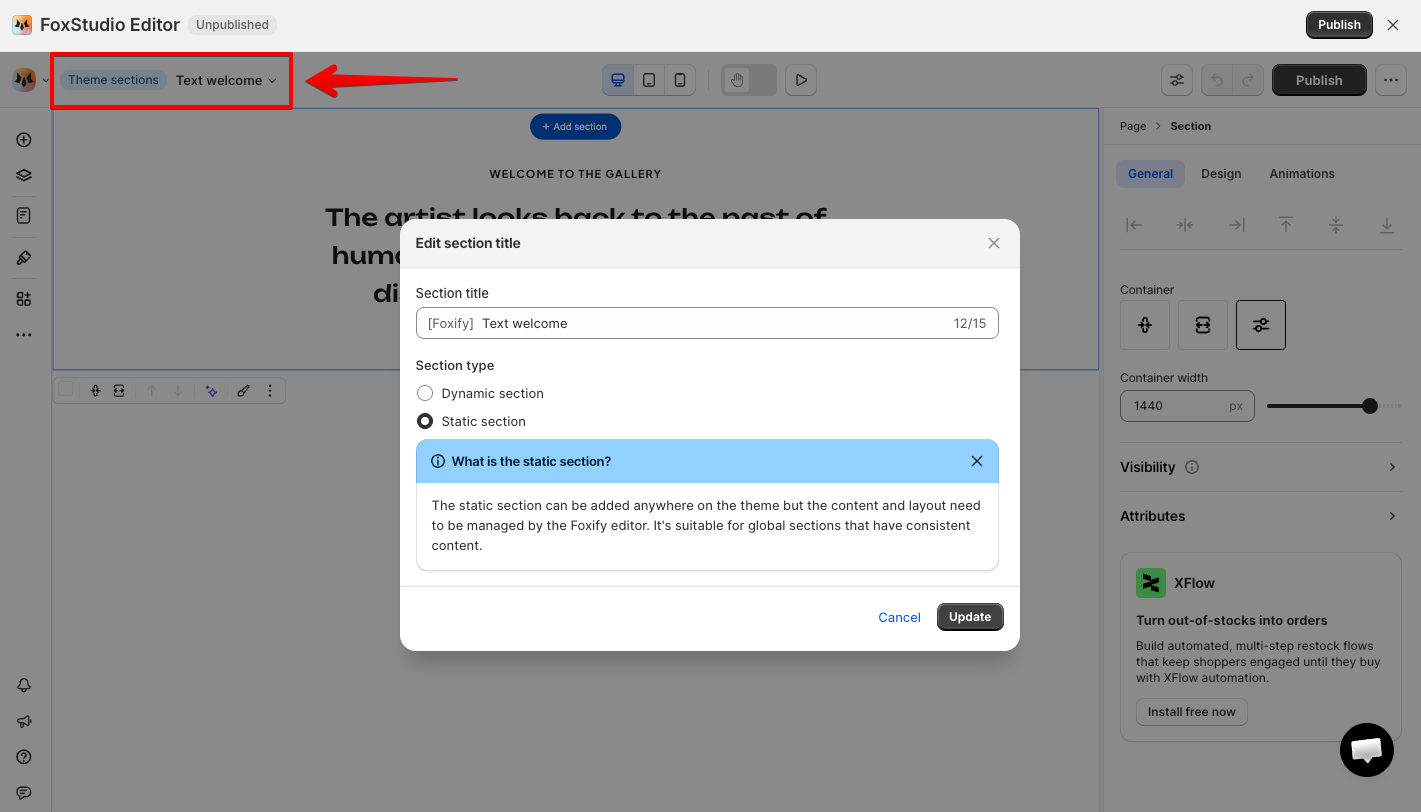
Before publishing, set your section title and type:
1. Click **Section settings** in the editor.
2. Enter a **Section title** — this is how the section appears in your Shopify Theme Editor.
3. Select a **Section type** (Static or Dynamic)
4. Click **Update**.
Click **Publish** when your section is ready.
Publishing your section in Foxify does **not** add it to your storefront automatically. It makes the section available to add in your Shopify Theme Editor — nothing changes on your live store until you add it there.
1. Go to **Shopify admin > Online Store > Themes**.
2. Click **Edit theme** on your active theme.
3. Navigate to the page template where you want to add the section.
4. Click **Add section**.
5. Find and select your Foxify section — all Foxify sections are labeled **\[Foxify]...** in the list.
6. Click **Save**.
✅ Done when: the section appears on your storefront page.
## FAQs
#### How many sections can I create?
The number of sections you can create depends on your Foxify plan. Go to **Settings > Plan** to see your current plan usage.
#### What happens when I delete a custom section in Foxify?
The section is removed from Foxify and automatically deleted from any theme pages it's been added to. Make sure you want to fully remove the section before deleting — this action cannot be undone.
#### What if I have multiple themes?
You can change the theme Foxify works with and re-publish the sections to add the custom theme sections to that theme. See: [Pick a theme to work with Foxify]()
#### I created a section before v5.3.0 — will it still work?
Yes — existing sections are not affected. They'll continue to work and will open in the Legacy editor when you edit them. Only new sections created from v5.3.0 onwards use FoxStudio.
#### Can I use a Foxify theme section on a Foxify page?
Not directly, but you can reuse the section design as a Saved Asset — this only works for sections created in the FoxStudio editor. Right-click the section in the editor, select **Save as Asset**, then add it to any Foxify page from **Add elements > Saved assets**. Sections created before in the Legacy editor and can't be saved this way. Learn more: [Save and re-use Assets](https://docs.foxecom.com/foxify-app/foxstudio/page-customization/save-and-re-use-assets)