A mega menu is a drop-down menu in which the top-level item has two levels of nested drop-down menus.
A mega menu impacts how shoppers discover your product offerings and other information, which lets them browse easily and seamlessly. It is a perfect design choice when building a website with multiple categories and subcategories. The design also provides sufficient space for images (banners) and other rich content.
Different websites require different kinds of menus, depending on the size, nature, and objectives of your store.
## **How to create a Mega menu**
1\. Go to Shopify **Content > Menus** to create a menu.
2\. Click **Add menu** to add new or choose any items below the menu to edit.
3\. Write the menu's name, then choose **Add menu item.**
4\. Write the menu item's name and choose the item in the dropdown box > click **Add.**
5\. To add an item to a child menu, drag it under the main item.
Menu items can also be added to create the same level as a child menu.
{% hint style="info" %}
If you want to create a mega menu, you need to add third-level items.
{% endhint %}
## Add a Menu to the theme
1\. Go to **Themes > Customize**
2\. Click on the **Header** section > **Menu** to add the menu you have created.
The newly created menu is now shown on your storefront.
{% hint style="success" %}
To enable the mega menu, in the **Header** section, click **Add block** > add **any Mega menu block** you want and **fill in the exact menu item name**.
{% endhint %}
## Customize the Mega menu
{% embed url="https://youtu.be/V5nZfLeBam0" %}
### Add a top bar to the menu

To achieve the result above, kindly follow the steps:
1\. Go to **Themes > Customize**.
2\. In the **Header** section, select **Add block** > choose **Top bar.**
3\. Enable/ disable a divider, transparent effect, and addons by checking the boxes.
You can add a message or leave it blank if you do not want to show it.
### Add a banner to the mega menu
.png?alt=media\&token=5f82003a-6437-4164-a219-e9d626aa949c)
To achieve the result above, kindly follow the steps:
1\. Go to **Themes > Customize.**
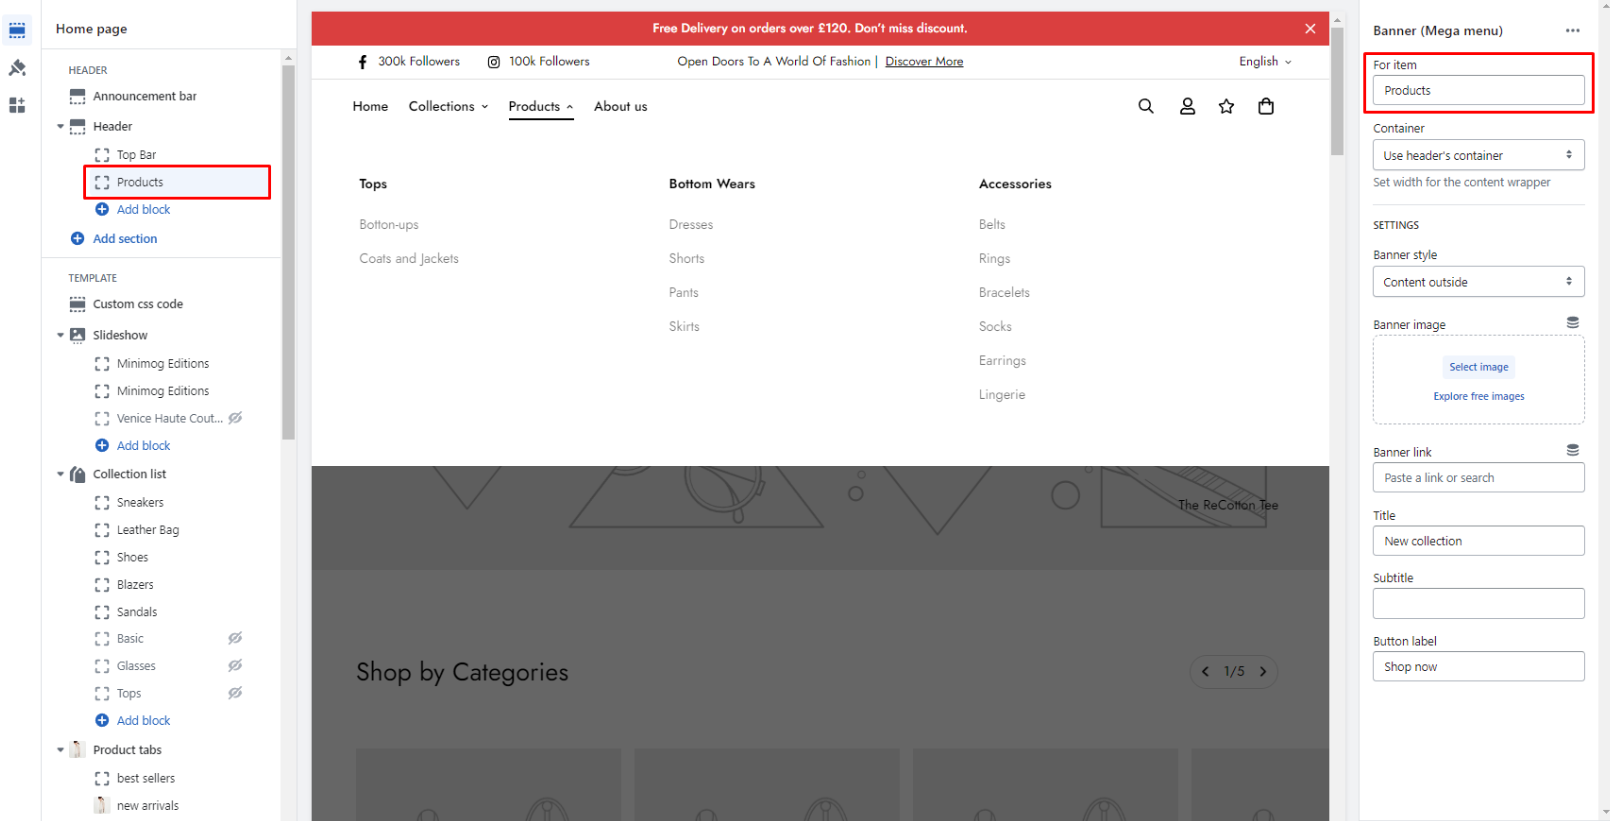
2\. In the **Header** section, **Add block** > choose **Banner (Mega menu).**
.png?alt=media\&token=1871e9af-47b7-42e3-b5e9-2154ab510c19)
3\. Match the text in **For item** element with the corresponding menu item you want to add a banner.
Select container wrapper width: use header' container, default, full width, or use container box.

4\. In **Settings**, add an image and insert a **link, title, subtitle** and **button label** (optional).
.png?alt=media\&token=a82a3b7f-ee10-45de-bac7-1b14d649f21c)
### Add a product list to the menu

To achieve the result above, kindly follow the steps:
1\. Go to **Themes > Customize.**
2\. In the **Header** section, **Add block** > Choose **Product list (Mega menu).**
.png?alt=media\&token=4890e028-17f2-41be-a7b5-250ec153d76d)
3\. Match the text in **For item** element with the corresponding menu item you want to add products list.
Select a **collection** for this section, set the number of products and columns to show.
Select container wrapper: use header' container, default, full width, and use container box.
.png?alt=media\&token=442a413c-37af-4420-90a2-b27ee034978d)
### Add blog post to the menu

To achieve the result above, kindly follow the steps:
1\. Go to **Themes > Customize.**
2\. In the **Header** section, **Add block** > Choose **Blog posts (Mega menu).**

3\. Match the text in **For item** element with the corresponding menu item.
Select a **Blog** for this section and select container wrapper width: use header' container, default, full width, or use container box.

### **Add collections to the menu**

To achieve the result above, kindly follow the steps:
1\. Go to **Themes > Customize.**
2\. In the **Header** section, **Add block** > Choose **Collections (Mega menu).**

3\. Match the text in **For item** element with the corresponding menu item you want to display collections.
Select container wrapper width: use header' container, default, full width, or use container box.

4\. In the **Collections list**, choose the collection and add its featured image.

### Add custom HTML to the menu
1\. Go to **Themes > Customize.**
2\. In the **Header** section, **Add block** > Choose **Custom HTML (Mega menu)**

3\. Match the text in **For item** element with the corresponding menu item you want to add custom HTML.
Select container wrapper width: use header' container, default, full width, or use container box.




.jpg?alt=media&token=c4b723d7-262d-4676-9bc2-81306a265b67)