---
description: A guide to set up a flexible announcement message bar in the Header
---
# Announcement bar
An announcement bar is a short snippet where you can showcase a message to your site. The **announcement bar** is an excellent way to grab your customer’s attention with important messages, promotions, or countdowns.
## How to add an Announcement bar section to your Shopify store
{% hint style="success" %}
Steps:
1. In the theme editor (**Customize**), navigate to the **Header** group and click **Add section.**
2. Select the **Announcement bar.**
3. Make necessary changes.
4. **Save** the settings**.**
{% endhint %}
{% hint style="info" %}
✨ Pro tip: Use the announcement bar to share time-sensitive offers like free shipping, flash sales, or store updates. Adding an engaging message here can immediately catch your visitors’ eye!
{% endhint %}
## How to edit an Announcement bar section
### Section settings
These settings control the overall appearance and functionality of the announcement bar.
* **Color scheme**: Choose a color scheme that matches your brand.
See how to set up Colors: [colors](../theme-settings/colors "mention")
* **Desktop content width**: Adjust how much space the announcement bar takes up on desktop (for screens with screen width > 1280px)
* **Auto-rotate announcements**: Enable this to cycle through multiple announcements automatically. You can set the interval (e.g., every 5 seconds).
* **Section padding**: Add padding at the top and bottom to fine-tune the spacing of your bar.
### Block settings
The announcement bar has two block types for added flexibility: **Announcement** and **Countdown Timer**.
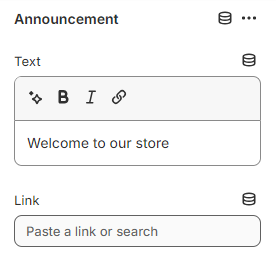
#### Announcement
The **Announcement** block is great for static messages like store updates or promotions.
* **Text**: Add your message, such as "Welcome to our store!" or "🚚 Free Shipping on orders over $50!"
* **Link**: Add a clickable link for further action, such as a link to the sale page or contact form.
#### Countdown timer
The **Countdown timer** block creates urgency by showing the remaining time for a promotion or event.
* **Countdown type**: Choose between:
* **Evergreen**: Automatically resets after a specific duration (e.g., every 12 hours).
* **Fixed Time**: Set an exact date and time when the countdown ends.
_Date formats accepted:_
| Name | Format | Example |
| -------------- | ------------------- | ------------------- |
| 24 hour format | YYYY/MM/DD HH:MM | 2025/10/04 23:30 |
| 12 hour format | YYYY/MM/DD HH:MM aa | 2025/10/04 11:30 PM |
* **Content settings**:
* **Text**: Add a custom message like "Hurry! Sale ends in…" to pair with the timer.
* **Button**: Include a call-to-action button, such as "Shop Now," with a link to the relevant page.
## Best practices
:white\_check\_mark: Do:
* Use short texts (make sure you try your store on mobile, where it is narrower).
* Limit the number of rotating texts to 2 or 3. While you can use more, your customers probably won't see them.
:no\_entry: Don't:
* An announcement bar can be easy to miss due to its small size. Therefore, avoid using the announcement bar for critical information. Instead, use a bigger section on the page.